Generic Domino Connector#
The generic connector for Domino allows you to configure any database in your Domino environment as a target for Mailissa. You can store the mail as a document and you can even associate it to an existing document.
Requirements#
If you want to run the Node.js based connector, you need the generic Domino connector installed on your Mailissa middleware. The Domino connector is also provided "stand-alone", which means you do not need the Node.js part in general.
The Domino server that will host the configuration application (a Notes database that comes with this connector) must have HTTP(S) enabled. User must have write-access to the database(s) where mails could be stored in. The server where target databases reside do not need to have HTTP(S) running but the server where the configuration application is running on must be a "trusted" server for the other servers. Data is transferred using the regular NRPC calls with the Notes API.
IMPORTANT: Preparing the Domino Server#
In addition, the Domino server needs some extra configuration to run the Domino connector NSF app as it uses certain Java libraries to manage the incoming requests. As of version 8.5.2FP6, Domino is delivered with a very restrictive setting of the Java Virtual Machine (JVM) that prevents loading of third-party libraries. To allow usage of those libraries you must add an entry to the Java security settings file. The file of interest is located in
<DominoProgram>/jvm/lib/security
Depending on the version of Domino, this file to be used is either java.pol (Domino 10 or before) or java.policy (Domino 11 or later). Using the file java.policy has a bad side effect: it will be overwritten every time you update the server or the JVM with patches, so please repeat the following steps after you update your server in the future. If you are using older versions than 11 and the java.pol file, the following settings won't be overwritten.
There are two ways to grant permissions to the third-party libraries the Domino Connector uses:
- for this Domino Connector NSF app only
- a global setting for the whole server
To grant permission to the particular NSF, append the following lines to your Java security policy file:
grant codeBase "xspnsf://server:0/<pathToTheNSF>/<fileName>.nsf/-" {
 permission java.security.AllPermission;
};
Replace <pathToTheNSF> and <fileName> with the corresponding path and file name of your Domino Connector NSF app.
A slightly easier way is to grant permission in general by appending these lines to the Java security policy file:
grant { permission java.security.AllPermission; };
Some say this is an insecure setting though this does not mean that code can be executed without any restriction, it just allows usage of third-party libraries in XPages-based applications which however was allowed by default prior to the above mentioned release.
For more information please consult the official docs: https://hclpnpsupport.hcltech.com/csm?id=kb_article&sys_id=d397e86c1b6df30083cb86e9cd4bcb01
Configuration of the Connector Service in the Middleware#
Depending on if you use the Node.js connector part or not, the setup of the connector service is different at the URL part. If you use the Node.js part, please refer to the documentation on how to set up a Node.js based connector.
When running the connector natively on Domino without Node.js, your URL has to point to the NSF file and a certain XPage:
http(s)://<yourDominoHostName>/<pathToTheNSF>/<fileName>.nsf/domino.xsp
Setting up the configuration application#
Either you can work with a pre-built template (.ntf) or you can use the ODP (on-disk project) that is shipped with the Domino connector. Once you have the .nsf up and running, you have to set the ACL. User need at least read-access. Administrators should have at least editor access and servers should be manager. Please add a role [Admin] and assign this role to your administrator's account or group.
The Configuration Application#
The goal of the generic Domino connector is to allow non-developers to connect to any Domino database by just configuring target databases, views and how to store the mail.
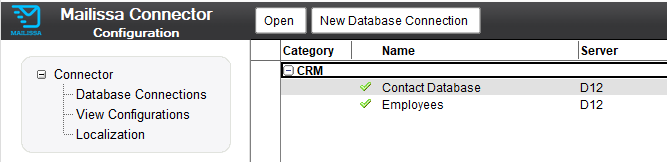
The configuration knows only three types of documents:
- Database Connections
- View Configurations
- Localizations
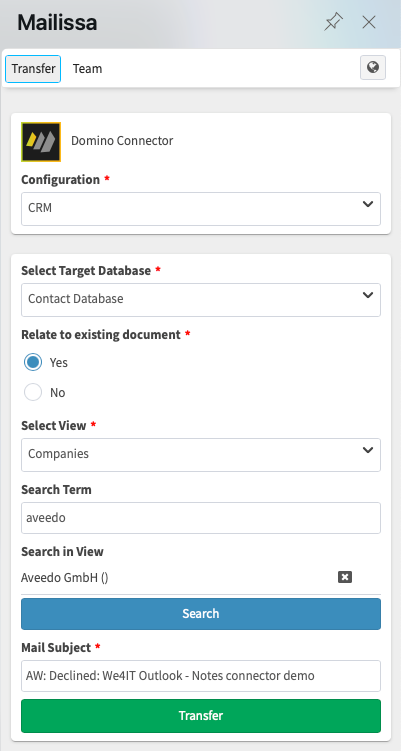
The minimum configuration is to set up a Database Connection. A View Configuration is only used to allow users to search for existing documents, to select one of the found documents and to relate the mail to this document.
Open the app in your Notes client. You will be presented with the start view, which displays document of the type "Database Connection".
Database Connection#
Create a new Database Connection by clicking the action in the view.
Only the fields in the first section are required.
| Field | Purpose |
|---|---|
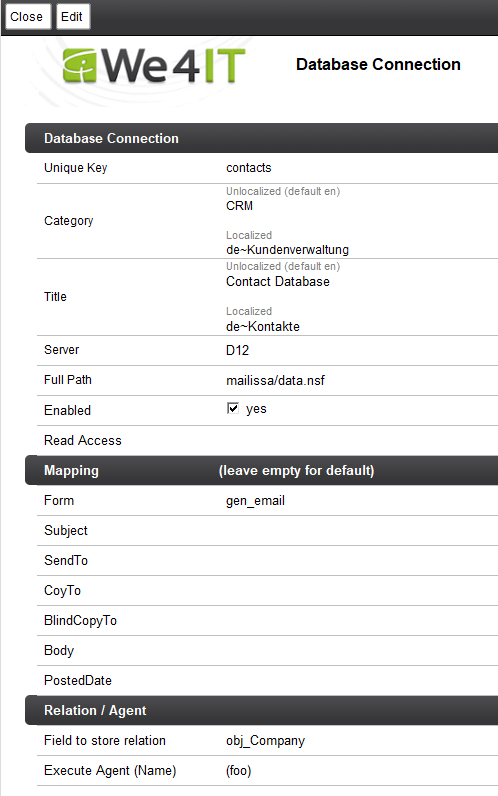
| Unique Key | Free text value, this key will be used to assign view configurations later. You should not use spaces or other special characters |
| Category | Define or select a category for this connection. The category will be displayed later in the list of "Configurations". This value is used as a display value for the English locale. |
| Category (localized) | Same as above, but defines the category for a certain locale. The format is locale~category, e.g. de~Kundendaten |
| Title | Free title for the connection. This will also be the display name for the user. This value is used as a display value for the English locale. |
| Title (localized) | Same as above, but defines the title for a certain locale. The format is locale~title, e.g. de~Kontakte |
| Server | Domino server name (full canonical or abbreviated name is recommended) where the target database is located |
| Full Path | The full file path including the .nsf filename of the target database |
| Enabled | Only enabled databae connections will be visible later. With this you can temporarily hide a connection. |
| Read Access | Reader field to determine who should see and use this connection. Valid names are users, groups and roles. |
Mapping#
These sections allow to map the mail data to custom fields. If you leave them blank, the default field names from a standard Notes mail (subject, from, sendto, body, …) will be used (“Memo” is used as form name).
If you need to have a different form name for the document that contains the mail, define the form name for the form field here.
Relation#
If you want to allow the stored mail to have a relation to an existing document, you can define the field name here where the connector will store the UNID of the existing document. The UNID will be stored as text. Using a relation will show an additional step during the transfer where the user has to select the existing document. Usually it is located using a search. How a search will be performed is controlled by the view configuration (see next section).
Execute Agent#
This field allows to define an agent's name. This agent must reside in the target database. This allows you to do more with the stored mail document if you need to.
The agent is executed with a DocumentContext. To access the stored mail document, you have to use the DocumentContext. This is an example in LotusScript:
Option Public
Option Declare

Sub Initialize
  Dim session As New NotesSession
  Dim doc As NotesDocument
  Set doc = session.Documentcontext
  MsgBox("Mail subject: " + doc.subject(0))
End Sub
This will just print the subject of the stored mail to the server console.
The agent must be set as "Run as Webuser" and must be signed with an appropriate ID.
View Configuration#
The view configuration is mainly used to define how a search over existing data is performed and how the search result is displayed. This type of configuration is only needed if your Database Connection offers the relation to an existing document (by defining a field name accordingly).
| Field | Purpose |
|---|---|
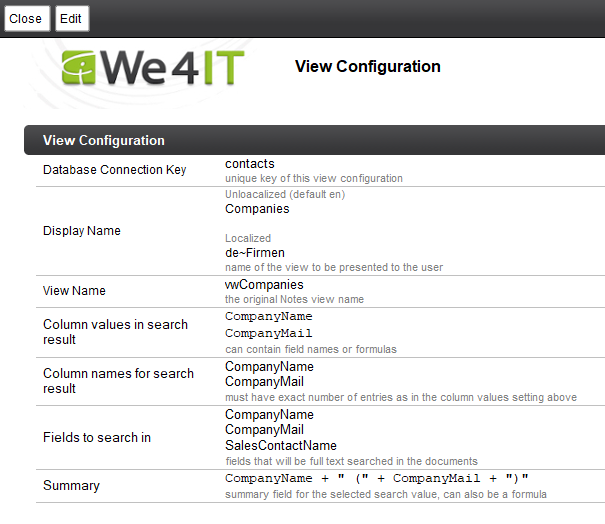
| Database | Select the Database Connection you created earlier where this View Configuration will belong to |
| Display Name | View names usually have technical names, so you can define the display name here. This is presented to the user. This value is used a the display name for the English locale. |
| Display Name (localized) | Same as above, but defines the display name for a certain locale. The format is locale~display name, e.g. de~Firmen |
| View Name | Technical name of the view in the selected database which you want to use |
| Column values in search result | Defines the values that will be displayed for each entry in the search result. Each line in this field will be used as a separate value. These act as a formula, so you can use just field names or complex formulas to format the individual value |
| Column names for search result | For now you can leave this field blank. If you plan to search within the results, you have to define a real list of column names here. The number of names here must be equal to the number of column values from above. |
| Fields to search in | Define field names here which are used to generate a full-text search formula. Attention: avoid using long field names and/or a large number of field names here to prevent full-text syntax errors. Full-text search terms are limited in length. |
| Summary | When the user selects a document, the UNID will be used in the transfer process, but the summary value here is displayed in the connector pane. You can also use a formula to combine and/or format field values |
Customizing the labels (Non-Node.js only)#
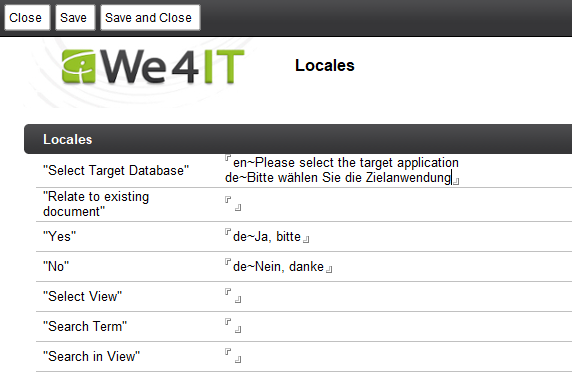
If you are using the Domino Connector without Node.js, you have a decent localization option for the labels used. Labels are pre-defined for English and German, however you can also customize these locales and also add new locales for your own language.
In the Connector Configuration NSF you find the localization options in the navigation area under "Localization". This will open the configuration form. This contains a field for each label in which you define the locales - one per line.
You can decide if you want to define/override a label or not. To define a label, add a new entry in the corresponding field like
en~Please select the target application
This could be the label for "Select Target Database". Another example is shown here:
If you do not specify a localized text here, the default text will be used (for en and de). For all other languages that are not defined, English will be used.